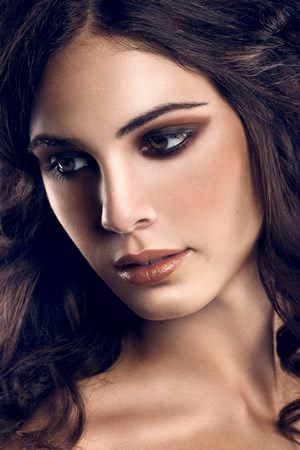
 In part 1 of this two part post on beauty photography we covered the details of organizing and budgeting for shoot day. In this part we’ll be focused more on concrete techniques such as common lighting configurations, camera settings and briefly discuss some important retouching techniques and steps.
In Camera Technique
As far as camera settings go it’s pretty simple. You’ll want to use a focal length in the range of 100-200mm (a 70-200mm f2.8 is usually a good choice) to achieve a flattering facial compression, or a macro lens if shooting facial details. If you’re just getting started then a run of the mill 70-300 lens will work just fine given the apertures we’ll be working at. ISO will always be at the lowest native setting and a small aperture (f/11, f/16) is typically used to get a wide depth of field and reveal lots of detail. Shutter speed will be in or around your flash sync speed of 1/160th to 1/250th so you can pretty much set it and forget it. With those settings largely fixed, all that’s left is to adjust your strobes to the correct ratios to achieve the right exposure and effect, which you can do with trial and error, or a light meter. Pretty much any modern DSLR will perform great so there’s probably no need to rent a Hasselblad H5D with a 60mp back.
Lighting
Lighting for beauty photography follows that of standard portraiture but you’ll typically (not always) be going for a fairly bright, high key and relatively shadowless look. There are a myriad of lighting configurations with the most basic being one light, all the way to a complex six strobe setup. We’ll begin with a one light approach which serves as a good starting point if you don’t happen to have 6 strobes lying around, but you’ll ideally want 2-3 strobes to achieve a good and professional look.
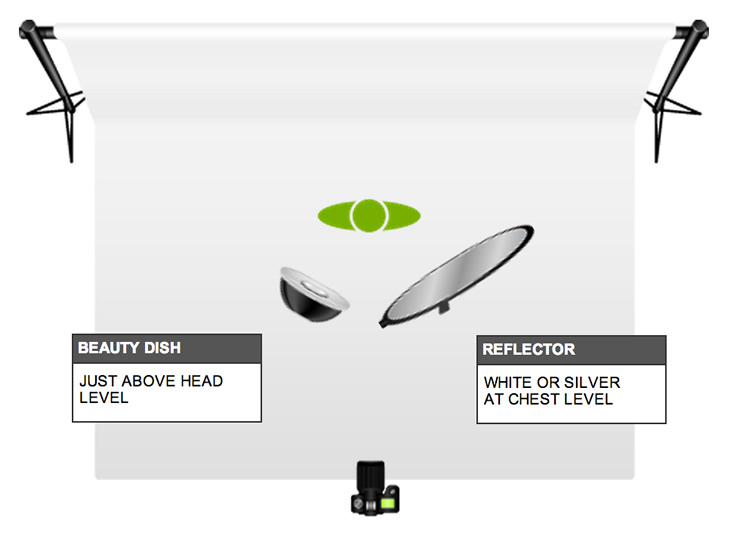
The above configuration is far from ideal as it relies on placing your subject close to the background and using the main light as a background fill. It will result in a bit of shadowing on the face but that can largely be mitigated by strategically positioning your reflector (or reflectors). The main light as is common in beauty photography is a beauty dish, with or without a diffusion sock over it. Typically I will use a 17″ beauty dish but in a single light configuration you’ll be better off with a large 24″ version to help spread the light a bit and also give you a softer light. If you have a small Octa then this can work as well if you pull the front diffusion material off and put a reflector pan inside it. Power is easy to set since your shutter speed and aperture are largely pre-decided, so it’s simply a matter of selecting a mid-level power setting on your strobe and adjusting up or down until the proper exposure is achieved. You could of course also take an incident light reading using a light meter if you have one. Use a white or bright background so that it can pick up as much light as possible given that you’re working without a dedicated background light.
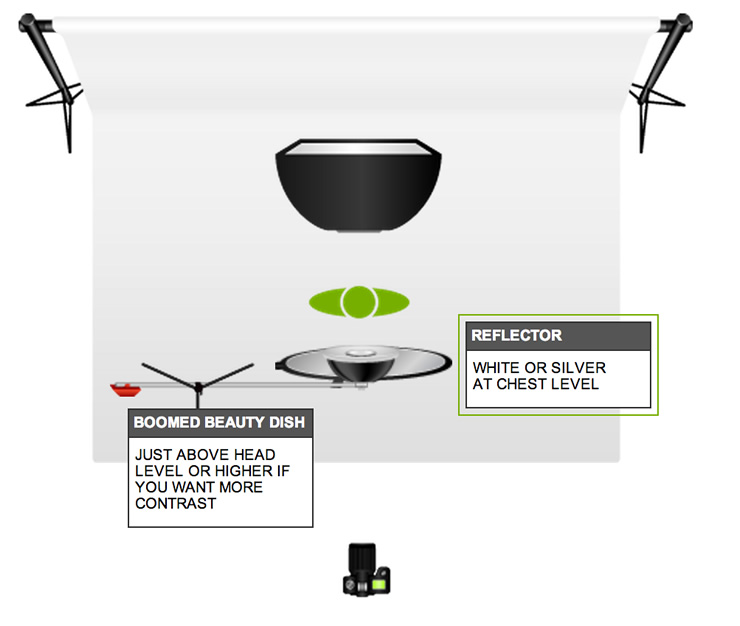
The above configuration is what you really want to aim for as a starting point. It requires only two lights and will produce a much better and more controlled result than the previous option. By having a separate background light we can eliminate shadows and set up our main light in a more typical clamshell configuration with a beauty dish more or less centred on our subject and a reflector at chest height. The beauty dish size doesn’t matter too much although larger is simply going to give a softer light and the reflector can either be silver or white, or simply a piece of foam core. A Lastolite triflector works best if you’re looking for a nearly shadowless and clean light but on a budget you can just take three pieces of white foam core and simply box your subject in with them. The background light doesn’t have to be a softbox. An umbrella, reflector, snoot, etc will all do the trick depending on how much light spread you are looking for. Set the power of your main light first without the background light and then adjust the background light to achieve the look you’re going for. If you see a lot of spill from your main light onto the background, simply bring your subject further away from the background. If you have a third light you can either use it to more evenly light your background by placing the background lights to the right and left of your subject, or replacing your reflector and using it as a fill light, as in the next configuration.
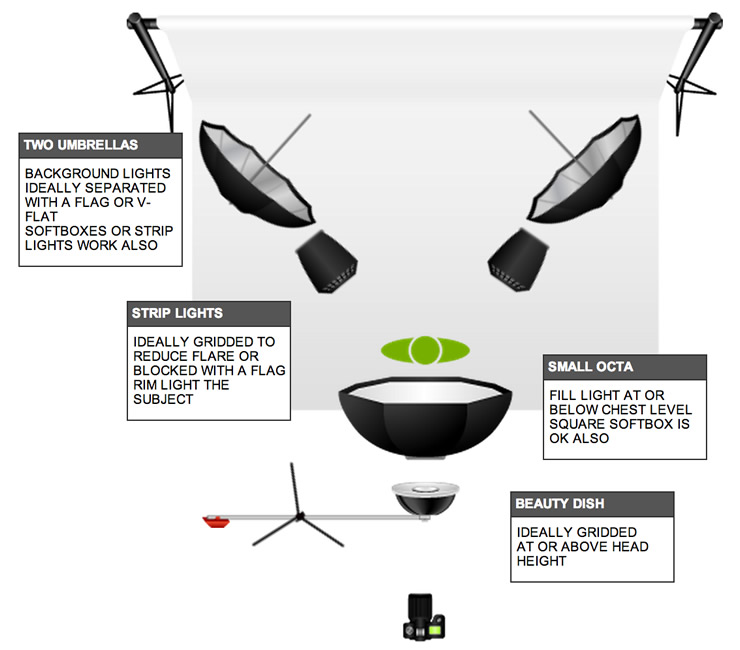
This final setup is on the extreme end, and you can use variations of this with just one or none of the rim lights behind the subject. I find that the rim lights create a really nice professional look so use them if you’ve got them. Essentially we’re creating a nice, symmetrical, bright look here and having control of each element without relying on reflectors. Once again the main light is in a clamshell configuration but instead of a reflector we’re using an Octa or softbox as our fill light. The ratio of main to fill is usually around 1:1/2 or 1:2/3 so experiment with those values to see what works best for you. If you’re looking for a bit more shadow you can drop the beauty dish a bit lower and loose the fill altogether (provided you have rim lights). The rim lights will be at a ratio between 1:1/2 and 1:1 of your main light, depending on the size of your diffuser and distance from the subject. For beauty you’ll typically want the rim light to be an accent and not to go too far into the cheeks. Be sure not to blow out skin detail on the cheeks so it’s better to be a bit too low in power than too high. Try your best to keep the rim lighting perfectly symmetrical or completely asymmetrical as anything in between will simply look sloppy. Often times a single rim light can look quite nice if you shift your main light to one side and place your rim on the opposite side. This can give a nice light-shadow-light sort of look across the subject’s face. For your rim lights you can use either strip lights (1′ x 3′ is fine) or you can use rectangular softboxes (2′ x 3′). Ideally your strip lights or softboxes will be gridded to reduce flare and loss of contrast but you can also place a flag (or gobo) between your camera and the rim lights to reduce this problem as well. Since grids are ridiculously expensive, the flag option is usually more economical. If you have black V-Flats then all the better. You can make do with a single light for the background but two will give you a more even distribution. Once again the background diffuser can be just about anything but avoid using bare flash heads as the light can spill onto your subject. Since there are lots of lights to adjust, work on adjusting your rim lights first and making sure that they don’t light too much of the side of the face and that they’re not too bright. Once those are set, dial in your main light, then try it with both the main and rim lights, and finally adjust your background light to taste. As you get into more complex setups like this, a light meter can be advantageous but isn’t necessary with a bit of practice.
You can use lots of variations of these three configurations so these are intended to serve as a starting point or road map. As far as equipment, 400ws strobes are more than sufficient so there is no need to splash out for 1200ws high-end equipment.
Retouching
Beauty retouching is essentially just portrait retouching taken to the extreme. If you’re new to portrait retouching then beauty is not the place to get your feet wet. In this case it’s best to hire a retoucher and have them do it for you. Be clear on what it is that you’re after. Provide samples of images that they can use as guides as styles can vary. Be sure to specify what it is that you’re looking to emphasize in the image. Is it the eyes, lips, hair, make-up, nails, jewellery, etc? Do you like a heavily dodged and burned look or do you want something more subdued and natural? Once again, a set of samples act as the best guide so be prepared with those. A beauty retouch can take anywhere from 3 to 8 hours so if someone offers to do it for $20, you’re probably going to get exactly what you pay for. Expect to pay from $80-$200 per image depending on the extent of the retouch and the retouchers experience. The number one thing that drives costs up is hair so fix it in camera by having a stylist perform regular maintenance during the shoot. Stray hairs and creating perfect strands can take hours and double or triple your retouching bill so keep this in mind.
Let’s say you have some experience in portrait retouching and want to go it alone. While it would be impossible for me to cover all the beauty retouching steps in this post, let alone one post, some key steps include:
- Get the exposure right through global or selective levels/curves adjustments. If you adjust this at the end you may find that certain elements were missed in the retouch, or they were darkened to the point where they didn’t matter anyway.
- Get your colors right (see my tutorial on color adjustments). Start with adjustments to skin tones, make-up, background etc. If the shoot is for a particular type of make-up or a piece of jewellery then be sure to keep those true to color (using a color checker passport or other tool).
- Use the liquify and warp tool to make the model look as good as possible. Remember in beauty photography you don’t get points for making the model look like herself. Drop the shoulders to lengthen the neck, smooth out bumps in the hair, enlarge the eyes, improve feature proportions (nose, lips), etc. Don’t overdo this of course, we want her to look human!
- Remove blemishes. Use the spot healing tool, healing brush and clone-stamp tool to tidy up acne, scars and any other imperfections. Freckles and moles are left to your discretion. In a portrait I would always keep them but again, with beauty anything goes. Do not use any sort of blurring or skin smoothing shortcuts!
- Even out the skin tone/texture. Use frequency separation to even out skin tone and create nice tonal gradations. By using frequency separation rather than clone-stamping you’ll retain all the texture and pores.
- Enhance features. This involves a bit of artistry as it can include anything from creating tight lip lines and highlights, to drawing in eyebrows and eyelashes. Commonly the Sclera (whites of the eyes) will get cleaned up, and the Iris will be selectively brightened (depending on the shot of course).
- Retouch the make-up by performing edge clean-up and blending. You can check out my tutorial for modifying make-up with frequency separation for more information.
- Add more texture using a grainy or pore simulating brush. This part is tricky and is usually where an experienced retoucher will shine.
- Dodge and burn. This is one of the most important things you can do and you can watch my tutorial on Dodging and Burning methods to help get you started. If hair is an important part of the photo then be sure to also check out my tutorial on making great hair highlights. You may also need to clean up fly-away’s and crossing hairs and this will take lots of patience.
- Perform selective sharpening on the eyes, hair, lips and jewellery. It’s important to sharpen with restraint and only on parts of the image so that artefacts remain at bay. Typically unsharp mask and high pass filter sharpening will work well.
While it’s impossible to cover everything involved in beauty photography in great deal within one or two blog posts, hopefully this article – and the previous one – will serve as good starting points and references for your next shoot.

